tooth fairy box tutorial...
 A quick trip to the store and pick-up supplies...
1 wooden box with shadow box-type top, 1 set of tooth fairy themed stickers, paint, and some glitter (the finer the better)
 Paint the box inside and out, let dry...

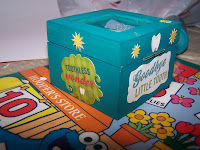
 For the shadow box-type top (I have no idea what to call it) put a tooth sticker directly in the middle of the square of wood, fill the window area with glitter, put the wood square back in, and seal with hot glue...
 It will look like this... continue to decorate with stickers...
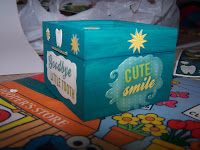
 Don't forget to put stickers on the bottom too! You could varnish the whole thing if you would like. My daughter loves these and we have made some for her friends. It is easy enough that she can make one too.
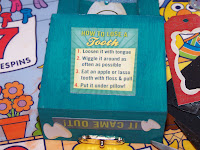
The only thing I am not thrilled about is the bead of hot glue running around the edge of the square. I need to neaten that up a bit...
Enjoy!

Comments
Chrisanne will be losing her teeth soon and I've been looking for pillow with a pocket to make her - maybe with counted cross stitch or something. I *really* like this box, though, maybe I'll try this instead!
I've become a craft nut too over the years. You should see my basement. It's crammed with craft stuff.